Sunday, October 30, 2011

Rise of the Orchid!


Happy Halloween everybody!


 I created this picture based on a photo that I took with Quickpix of an Orchid that I placed on our kitchen table, under the kitchen light - nothing else. Apps that I used? Well it's Halloween so guess yourself how I did it! The photo that served for the base of this creation is displayed below. Just take a close look at the evil Orchid - do you see the tongue that is licking for you and the teeth waiting for a bite on you? Well... ;o).


~~~~~~~~~~~~~~~~~~~~~~~~~~~~~~~~~~~~~~~~~~~~~~~~~~~~~

Friday, October 28, 2011

Scrapped

Camera Apps:
BracketMode - for the photos that served as the base for the HDR picture.
Hipstamatic - for the b/w retro photo on the end of this page.
Additional Apps used:
iCameraHDR - for the HDR picture made from the the BracketMode photos.
SimplyHDR - to enhance the HDR effect and for fine tuning.
MonoPhix - to create a b/w version of the HDR. No color filter applied, shades set to 0.
Blender - to blend the color HDR with the b/w HDR to enhance colors and contrast. Blending mode was Overlay, slider set to 27% only. More would have darken the sky too much.
Camera+ - for the nice frame. I used the frame called Light Grid. There are other apps offering similar frames but I prefer the one provided by Camera+.
MergeEasy - to put the pictures of the different steps together in a strip so you can see the differences.
A+Signature - for my copyright watermark as well as the labels on the photo strip.
Old 3612 now awaits the cutting torch after being partially scrapped of usable parts. I'm not sure with this but it could be the parts scrapped from her served to restore 3608 to factory fresh condition. Currently 3608 is in the paint shop where she'll be repainted in her original green+gray colors from 1956. The above photo strip show the different steps I made until the final picture before the frame was added. The picture below shows the engine's number with the modern company logo CFL.
~~~~~~~~~~~~~~~~~~~~~~~~~~~~~~~~~~~~~~~~~~~~~~~~~~~~~~~~
~~~~~~~~~~~~~~~~~~~~~~~~~~~~~~~~~~~~~~~~~~~~~~~~~~~~~~~~

Sunday, October 23, 2011

Reading Greg's Diary


Camera App: QuickPix
Additional Apps used:
Squaready - to crop a 1:1 square picture from the original photo.
Perfectly Clear - to enhance the picture.
MonoPhix - to create a b/w layer. I love MonoPhix to create black and white pictures because it is very easy to use and it comes with color filters.
Blender - to blend the b/w layer with the color layer to reduce saturation. Blending mode was Normal, slider set to the middle 50/50. I did this in preparation for using SimplyHDR because HDR effects usually overdo it with saturation.
SimplyHDR - to create a HDR layer.
Blender - to blend the HDR layer with the normal color layer to reduce the HDR effect by 50%. That means both layers had been blend in Normal mode, slider set in the middle 50/50.
PicGrunger - to create a grunge version on Burlap, Strength set to 0, style chosen was Block Party.
PhotoSuite - to add nice photo frame.
A+Signature - to add my copyright watermark.
This afternoon I caught my youngest daughter Melina reading a book. It's German title is "Greg's Tagebuch" which translates as "Greg's Diary". It's a great reading for children and my daughter loves the whole series. We're a family of book worms anyway. We all enjoy reading books - real books, not the e-books. Although I also use Kindle on my iPhone to read novels sometimes I think that nothing compares to the real thing of holding a real book in one's hands for reading. Smelling the paper and the ink.... the sound of turning pages in a quiet room.... and the impatience to read on until the next page can be turned, the next chapter be closed.... nothing compares to that.
Melina hates to be photographed so I had to switch my iPhone to quiet mode and sneak up on her for shooting. Here QuickPix came in really handy. It allowed me to quickly snap up a whole lot of photos before Melina finally got aware of my presence, then yelling at me "get that damn camera away you crazy paparazzo freak!" (grin). Well, the unsharp Instaplus picture below shows you what I am talking about ;o).


~~~~~~~~~~~~~~~~~~~~~~~~~~~~~~~~~~~~~~


Friday, October 21, 2011

The Beauty of Decay, Part 3.


Camera Apps: 
BracketMode
Hipstamatic - for the b/w pictures in the photo slide. Lens: Melodie, Film: A0 DLX


Additional Apps used:
iCameraHDR - for the HDR pictures in color.

SimplyHDR - to create two different HDR pictures with darker and lighter settings
Blender - to blend those two HDRs into one with 50/50 slider setting in Normal mode which nicely enhanced the picture.
MonoPhix - for a b/w version of the HDR picture. I usually chose a green filter with low shadow darkening
Blender again - this picture did not need too much blending because it turned already out very nicely after processing it in iCameraHDR. I created a b/w version to blend with the color version to obtain better contrast and richer colors but it didn't need a high setting of the slider to enhance it. Less is sometimes more. 

Snapseed - for adding some slight Drama effect plus enhancing saturation slightly.

PicGrunger - for a nice Grunge version with Metal structure. Even with the effect slider set to zero the picture turns out darker after processing but like I wanted only the frame I was loading the grunge version and the original version in FilterStorm3 to erase the dark picture from the frame so the lighter version came trough.EasyMerge - to quickly create a photo slide with four Hipstamaticphotos of the old steam engine.
As usual I added my copyright watermark in A+Signature.


This is the last one of the rusted wheels pictures of the old steam engine 5621. I enjoyed a lot making it because the structures of the rust and the colors turned out nicely.

Wednesday, October 19, 2011

The Beauty of Decay, Part 2.


Camera Apps: 
BracketMode
Hipstamatic - for the b/w pictures in the photo slide. Lens: Melodie, Film: A0 DLX


Additional Apps used:
iCameraHDR - for the HDR pictures in color.
PerfectlyClear - to enhance the previouly created HDR picture.
MonoPhix - for a b/w versions of the HDR picture.
Blender - to blend a lot! Again I must say that I did not keep track of the different steps for there had been too many. As usual I created b/w versions to blend with color versions to obtain better contrast and richer colors and I also used Blender to sharpen the final pictures a bit by application of my technique to create a high pass version in PhotoForge, then blend it with the normal version in Blender with mode set to Overlay. In case of this picture I always set the slider to 50/50, hence in the middle.

Snapseed - to create the inner black frame as well as for adding some Drama effect.
PhotoShop Express - to create the outer black frame.
FilterStorm3 - to erase the color from the frame.
TouchRetouch - for minor touch-ups.
EasyMerge - to quickly create a photo slide with four Hipstamaticphotos of the old steam engine.
As usual I added my copyright watermark in A+Signature.


Some more pictures of the old steam engine 5621. In the meantime I received some interesting information about the engine via the Face Book page "Lëtzebuerger Eisebunnsfrënn" (railroad friends Luxembourg). So I learned that 5621 was bought from the Austrian National Railroad Company OEBB in 1978 to run it as a museum engine for tourist attraction but the general management of our railroad company wasn't much positive about the project so it ran on museum tracks in Mariembourg in Belgium (1980) and later in Losheim (Germany) from 1982-1984 In 1984 it was transferred back to Luxembourg where restoration work started but due to a lack of funds got stopped again as the engine was already very much disassembled. It's original number was OEBB 52.3504 but it received the number 5621 to run in Luxembourg. More to come - stay tuned!

Tuesday, October 18, 2011

The Beauty of Decay, Part 1.


Camera Apps: 
BracketMode - for the photos serving for the HDR pictures
Hipstamatic - for the b/w pictures in the photo slide. Lens: Melodie, Film: A0 DLX


Additional Apps used (as far as I remember):
iCameraHDR - for the HDR pictures in color.
PerfectlyClear - to enhance the previouly created HDR pictures. This app is really helpful to create better pictures. Unfortunately it is a memory hog, often coming up with an out of memory error when processing a second picture. In this case all you need to do is closing all the apps running in the background, then restart PerfectlyClear again. No iPhone reboot required.
MonoPhix - for b/w versions of the HDR pictures.
Blender - to blend a lot! I can't even remember how many times I blend what layers because I did not write all the steps down. But I used b/w versions to blend with color versions to obtain better contrast and richer colors and I also used Blender to sharpen the final pictures a bit by application of my technique to create a high pass version in PhotoForge, then blend it with the normal version in Blender with mode set to Overlay. In case of this picture I always set the slider to 50/50, hence in the middle.
FilterStorm3 - to create a 3 nice frame. I used 10-20-10% for the three frames.
PicGrunger - to create a grunge version of my picture with the only goal to receive a badly worn and dirty frame that I wanted on my clean picture. Here I used the Metal texture with Scratched effect.
Superimpose - to put the grunge picture over the clean picture, masking the picture to cut it from the frame so the clean picture from the background layer could appear. This was quite a bit tricky to handle on the tiny iPhone screen but it all went well. Superimpose is currently the best masking app that I know.
Checking my final picture on the big screen I found some white spots, probably bird dung that I removed using TouchRetouch.
Apparently one of the apps that I used downsized the picture slightly so I had to resize it back to 2592x1936 in Iris. I still don't know what app was responsible for that but will check that out. 
EasyMerge - to quickly create a photo slide with four Hipstamatic photos of the old steam engine.
As usual I added my copyright watermark in A+Signature.


Since long years there is a disassembled old steam engine slowly rotting away at Luxembourg railroad yard. It's number is 5621 and it is said it was a so called "Kriegslok" - a war engine ordered by the German Reichsbahn as the Grand-Duchy of Luxembourg was still occupied by the Germans in WWII. The engines had been build in Austria. But then the war ended and the remaining engines of that order got delivered to the newly founded "Société Nationale des Chemins de Fer de Luxembourg  (SNCFL) - the National Railway Company of  Luxembourg. I don't know much about the complete history of engine #5621 but it was still running as a tourist attraction in the 1970s. Later it needed restoration and some bloody amateurs took it apart, not possessing the knowledge to perform a proper restoration nor having the funds for it. Now it's slowly rotting away and nobody knows if it will ever be restored to it's old beauty again. At least it is a nice subject for pictures so I took another chance yesterday to photograph it again. This picture is part one of a set of two. 


Sunday, October 16, 2011

Rolling Horse


Camera: Canon EOS40D
Lens: 17-85mm EF USM Kit Lens
Extras: Polarization filter.


Apps used for processing:
Squaready - to cut the picture to 1:1 format.
SimplyHDR - for a HDR picture in color.
DramaticB&W - for a b&w HDR picture.
Blender - to blend both HDR pictures with the goal to obtain a deeper blue color of the sky.
TouchRetouch - for minor touch-ups.
FilterStorm3 - to soften (denoise) the sky. I applied a mask to spare the sculpture from being blurred too. Unfortunately a negative side effect of pseudo-HDR rendering by apps is to end up with a dirty and noisy sky.
PhotoForge2 - to create a high pass layer which I then blend in Blender with the original layer in Overlay mode for sharpening the picture.
SnapSeed - to apply sort of a Lomo like filter because I wanted a Lomo effect but wasn't happy with the Lomo effect in PhotoForge2 because it's vignetting effect cannot be adjusted.
FilterStorm3 - to create a 25% white frame.
A+Signature - to add my copyright watermark.
Instagram - to apply the Rise filter. This was fading out to colors again but it was just fine to share it with the Instagram community. Tip: If you don't want Instagram to upload your finished picture all you need is switching your iPhone to "airplane mode". There is no Internet connection possible then so Instagram will tell you that the upload failed but saves the high resolution copy of your picture nevertheless.


Because I still wanted to try something else so I was loading the Instagram picture and the previous picture in Blender again to blend them 50/50 in Overlay mode which nicely enhanced the colors. Then I loaded the result in MonoPhix to create a b/w picture that I then blend again in Blender with the previous color picture to create my final, almost black and white version of the Rolling Horse. Setting was 27% color in Normal blend mode.

The title of my picture wasn't chosen by me. It's the official name of this huge 9.5m tall and 35ton heavy sculpture created by the German artist Jürgen Görtz for the German railroad company "DB". The Rolling Horse can be seen at the Berlin Main Station (Berliner Hauptbahnhof), "Europa Platz" right of the North Gate when leaving the station. My original photo was made on September 13, 2008.

Thursday, October 13, 2011

Fat Fun in Color


Camera App: iCameraHDR

Extras: Ollo Clip 3in1 lens system, wide angle lens used.

Additional Apps used:
iCameraHDR - to create a HDR picture from the previously made photos.
DramaticB&W - to create a beautiful b&w picture.
Blender - to blend color and b&w pictures because I wanted to give the b&w picture some color back but found the original color picture a bit too colorful.
A+Signature - for my copyright watermark.

It's a long way to the top if you wanna rock 'n roll.... well AC/DC's good old song certainly counts for creative artwork as well. I had been playing around for hours with various apps until I finally got the result I was looking for, and the solution was sooo simple. I also wasted a lot of time trying to find a nice looking frame, tried to give my picture a grunge look but in the end I dropped it all and went for a clean picture without frame. I love this one the most of all the versions I created before. What do you think? Does it look good? Better than the first version I created? You can find that one here: http://quaffit.blogspot.com/2011/08/fat-bike-fat-fun-fat-bob.html

Tuesday, October 11, 2011

Le Coeur Seignant.


Camera: Canon EOS40D
Lens: 17-85mm EF USM Kit Lens

Apps used for processing:
PhotoClr - to correct the underexposed original picture. The original photo had been made under bad conditions without a tripod. In the afternoon of a winter day the light is usually quite bad in a forest. I made the original photo with f/10, 1/125th and ISO200. Don't know why I set aperture to 10 as I made that photo. Maybe I just forgot to change the setting as I usually work on manual mode with my DSLR.
SimplyHDR - to create a HDR picture of my photo
Squaready - to cut it down to 1:1 square format. Squaready is meant to optimize photos for Instagram but it can save the files to 2048x2048 resolution in PNG file format.
Then I used FilterStorm3 for many operations, including desaturisation and importing the original HDR file to apply a mask so the background will be desaturised while the main subject (the heart) will remain in full color. After I was satisfied with my result I plaid around with various apps to find a nice frame for it. I added a tricolor frame in the French colors in FilterStorm but wasn't 100% satisfied with it.
PicGrunger - it was finally the good old PicGrunger that gave me the frame I was looking for. However it looked too saturated so I was loading the file again in FilterStorm to reduce saturation by 25%.
A+Signature - to add my copyright watermark as usual.

February the 21st 1916 one of the bloodiest battle in history of human warfare started in France, nearby the town called Verdun. It ended in December of 1916 with more than 700 000 casualties about equally shared between both sides, the Germans and the French. Verdun is a holy ground in France because it's name stands for strength and resistance against the German aggressor who believed to bleed out the whole French army on that place - but the Germans were wrong. Today visitors of the battle fields, the museums and the old forts are welcome, but they are also asked to walk the ground in respect of the dead. Ammunition can still be found everywhere but shall not be touched and there are many single graves to be seen there. One of these graves I spotted in the woods near the famous Fort de Vaux. I was decorated with an enameled metal heart, badly weathered throughout the decades that followed the death of the two soldiers buried there. Today one can still read the following French words:

Içi rep(osent)
(Ce) Deux cama(rades)
Henri LA(....)
du 171ième R.I.(...)
mort pour la Fr(ance)
à l'age d(...)
Priez po(ur eux)

Translation:
Here rest
two comrades
Henri La(...)
of the 171st Infantry Regiment
fallen for France
at the age of(...)
pray for them.

I made the original photo under quite bad light conditions since it was in a forest and it was winter, February the 27th 2008, 92 years and 6 days after the Battle of Verdun started. As I got home and transferred the photos to my computer I got aware of the red rust running down the enamel heart, almost like blood. For that reason I gave my picture the title "Le Coeur Seignant" (The Bleeding Heart).

Sunday, October 9, 2011

Luxembourg City...


Camera: Canon EOS40D
Lens: 17-85mm EF USM Kit Lens

Apps used for processing (as far as I remember):

Squaready - my first step was it to cut a 1:1 piece out of my original photo so I used Squaready, which is a neat little app meant to prepare photos to use with Instagram and it's clones.
PerfectClr - to correct the heavily underexposed photo which had not been corrected in Canon's Digital Photo Professional before. I discovered PerfectClr by chance, after reading an article about the upcoming improvements of the iPhone's Camera App and Pictures App in iOS5. I downloaded it and I am very satisfied with the possibilities PerfectClr offers to enhance any photo. 
SimplyHDR - to create a HDR picture of my boring looking photo. I did two versions, one with the Smooth slider set to full left and one with it set to full right. HDR style used was Brown.
Blender - to blend the smooth picture with the detailed picture in Normal mode to reduce the effect by 50%. After saving that result I loaded it again in Blender together with the original color picture to blend it 50/50 in Normal mode again to give it back some color. The result looked already very nice but still too boring to me.
DynamicLight - to add a slight 25% effect of its beautiful Orton filter. I wanted a soft glow in my picture to the Orton is very useful for that. However one must be very careful with DynamicLight because the negative side effect of it's usually nice enhancements of a picture is the resulting grainy sky. 
PerfectlClr - I was loading my photo in PerfectlyClr again to lighten up the shadows. To do this I used the setting FixDark which is just perfect for serving that purpose. The resulting image was very clear in its shadows but the negative side effect was the sky which was now a bit too bright.
Blender again - to blend the brightened up picture with the previous darker one. At last I was happy with my picture. I now went on to try several apps and settings to enhance it further, among them being the Instagram apps like the original Instagram, Instaplus, Instacam and ClassicINSTA, but I wasn't much satisfied with the results so I tried qbro. The latter is really a nice app to create 1:1 size pictures and it comes with a bunch of very useful frames and filters. I created a version of my picture with the filter Burnt, which looked really great but what I disliked about it was the very heavy grain in the dark brown vignette.
Camera+ - finally gave me what I was looking for. I applied the Hipster filter with a 25% setting and used the Old-Timey border where I added the title of my picture to.
A+Signature - for the copyright watermark.

In my times before the iPhone I used to carry my DSLR around all the time. The old town of Luxembourg-City is a tourist magnet because of it's old architecture, the Palace of the Grand-Duke and the Cathedral Notre-Dame and I love to photograph the buildings too. I made the photo that served for creating this iPhoneography picture on a dull day in March 2008 from across the valley of the Petrusse but like I had no tripod with me and my DSLR equipment not being the best I end up with mostly underexposed photos. But I did not delete them again because I always think that even an underexposed photo may be useful some day. As I stumbled over the neat little app PerfectlyClr I used such an underexposed photo to test its capabilites. The result is what you see here as the main picture of my blog entry. Before I forget - below is the original photo that I made on March 8, 2008:


Saturday, October 8, 2011

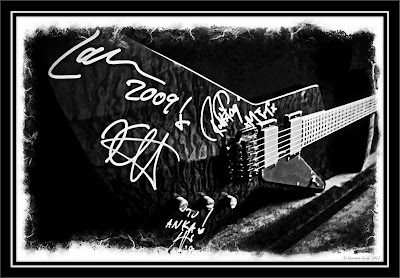
Signed by Metallica


Camera: Canon EOS40D
Lens: 17-85mm EF USM Kit Lens


Apps used for processing:


RAW file developed in Canon's Digital Photo Professional, then transferred to the iPhone with PhotoSync.
SimplyHDR - to create a color HDR picture. I used the setting Dark Contrasted... for it and created two versions. One version with all settings sliders for Radius, Strength and Smoothing set to the full right, then I created another one with the Smoothing slider set to the full left. The picture with no Smoothing brought out every little detail nicely, but as a negative side effect, every little corn of dust and every irregularity in the inner velvet cover of the guitar box also came out and this didn't look good. With the Smoothing slider set to full right, those unwanted details went away, but here the guitar looked too smooth. 
Blender - to blend both pictures in Normal mode, 50:50 slider setting. This gave me exactly what I wanted to have but still there was too much dust in the picture and too many unwanted details in the velvet background. I did not want to mess around for an endless time to remove every little dust corn in TouchRetouch so I transferred the picture to my laptop computer and applied the Remove Dust and Scratches filter in PhotoShop before I transferred it back to the iPhone. Removing dust in TouchRetouch is possible indeed but you'll need a lot a patience since the iPhone is very slow in processing, compared to a big computer.
To re-sharpen my picture I was loading it into PhotoForge2 to create a high pass version, then blend it in blender with the version I finished in PhotoShop. Settings blend mode Overlay, slider 100%, high pass on right side. Now my picture looked perfect to me and everything I still needed was a nice frame. I found one in Camera+, then I added the solid frame(s) in FilterStorm3. I added a black 10% frame first with dark gray outline, then a 5% white frame, then a 25% black frame again. To let the framed picture stand out from the black background of my blog I then added another thin 2% fark gray frame to it.
A+Signature for copyright waterm


July 28th 2009 was a very special day for my daughter Anna-Katharina as she met Metallica again in person. Lucky winner of a Meet&Greet before their last show in Copenhagen she asked them to sign her guitar which they kindly did. She only got it for her 17th birthday on April 30 of that year and did not have much chances for playing it. But since it got signed by the James Hetfield, Lars Ulrich, Kirk Hammett and Robert Trujillo it became the holy artifact of a true fan. I guess she'll never play it again.

Wednesday, October 5, 2011

How to simulate a hand colored black and white photograph on the iPhone


Camera App: Hipstamatic with Lucas AB2 lens and with Ina's 1935 film

In my second "How to" I now want to show you how to simulate a hand colored black and white photograph like those popular before the invention of the color negative film. The idea came to me last Sunday as there was Father's Day here in Luxembourg. My daughter gave me a wonderful book about photography. It's German title is "In 1000 Bildern um die Welt - faszinierende Fotografien aus den Jahren 1850-1910" (translates as "In 1000 pictures around the world - fascinating photographs from the years 1850-1910"). Already the cover shows a beautifully hand colored photo from the past plus there are a lot more of them inside of the book. I noticed that some of those photos had been fully colored while others had only been partially colored. I don't know if this was a matter of costs but it sounds somewhat logical to me that it was less expensive to color only the main subjects in a photograph rather than the whole picture.

Last week I had been in Luxembourg City and a guard was finally to be seen at the Palace of the Grand-Duke again. I'm not sure about this but like the guards aren't always present the conclusion lies near they are only on duty when His Grand-Ducal Highness is actually in the building. So I made a few photos of the guy standing on guard.

My first step was it to create a color pseudo HDR picture in SimplyHDR. Settings: High Dynamic Range tap > HDR Grain 01.


Then I used DramaticB&W to create a pseudo HDR picture in b&w. Settings: DramaticB&W tap > Dramatic 1. I decided to choose Dramatic 1 preset because it nicely enhances the details in the picture. Even if this appeared to be a bit overdone at the first look it will be reduced later when applying a dreamy effect.
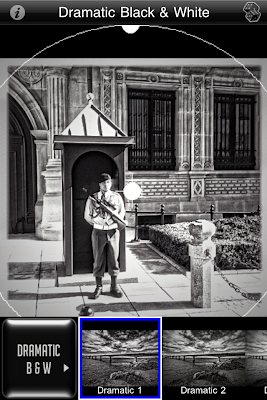

I used FilterStorm3 to apply a mask over the parts in the picture that I wanted to color. To do this I opened the color HDR first, then added the b&w HDR as a second exposure. I carefully painted a mask over the parts to be colored. It's a bit tricky but not impossible to do that on the tiny iPhone screen. But you need to be careful not to accidentally touch the [x]-button that cancels the operation or your whole work will be lost. It happened to me as I was already very close to finish the mask. Brush thickness is relative to zoom factor. This means the farer you zoom in, the finer the brush becomes even if you did not change its size which allows to paint a very precise mask. Painting the mask is a lot of switching between the hand tool (cross) to move the picture around, and the brush tool, as well as a lot of zooming in and out, so the danger is always present to accidentally hit the cancel button. If you're tapping too quickly on the place where your are painting the app takes this as a double tap and zooms out automatically which can be very annoying sometimes. 


Painting the mask

Clicking the finish mark processes the operation and the result is a dramatically detailed picture with parts of it in color. But this is still far from the old hand colored photographs that had been so popular before the invention of the color film as you can see on the result below:


After applying and processing the mask

At this point there had been still some flaws in the picture to be corrected. Please note the colored part of the sentry box base that is in the shadow of the sentry box. I colored it but that was wrong. Also the left edge of the sentry box looks way too saturated plus there is part of an unwanted object on the lower edge of the picture, in front of the guard's right foot and the original frame of the Hipstamatic Ina's 1935 film also doesn't look good anymore. Now how to correct this?

The easiest way to correct the color problems was it to load the picture again in FilterStorm3, adding the b&w HDR version as a second exposure, applying a mask to it - et voilà, the color had been removed.

The bigger problem was it to remove that unwanted object on the lower edge. For such purpose the app TouchRetouch is best choice. I opened the picture and applied a mask to the object I wanted to remove:

unmasked

masked

gone


After tapping the Remove tool (3rd from right) the object was gone, but then I faced a problem I found myself unable to correct. As you can see, the gap line between the tiles where the guard stands had also been interrupted. On a big screen using PhotoShop or any other software with a clone tool on board one can easily fix this, but on the tiny iPhone screen the menue bars always came in my way when I tapped the stamp tool. So I decided to leave this as it was and hoped it will later be hidden by a frame anyway.

Correcting the frame was easy. I cropped the picture from the old frame in FilterStorm3 and resized it back to 1936x1936px, then I opened it in PhotoForge2 to add a white frame (Frame 2).

My goal was it to find a way to reproduce the look of an old hand colored photograph as realistic as possible but at this stage my picture still looked far from what I wanted to achieve. So I loaded it into Romantic to create a dreamy effect. The setting used was Dreamy Photo > Dreamy Strong. I pulled the slider back to about 25% because the effect looked a bit overdone.

To give it an aged touch I opened that result in PicGrunger where I used the following settings: Style > Gig; Strength > 0; Border > none; Texture > original. The outcome of this looked great, but to my taste it was a bit too saturated. But that problem could easily be solved. I was loading the version that I saved before using PicGrunger plus the version after PicGrunger both into Blender and blend it in normal mode with 50% slider setting. The resulting image finally was what I wanted to get. As usual I added my copyright watermark in A+Signature.

It was big fun making this picture and I'm quite happy with the outcome of it but there may be better methods to simulate a hand colored old photograph so the search and experimenting goes on.

Tuesday, October 4, 2011

Le bon pain pour tout le monde!


Camera: Canon EOS40D
Lens: Canon 17-85mm EF USM kit lens

Apps used for post processing:
The original RAW file had been developed using Canon's Digital Photo Professional, then trimmed to 1:1 size before transferring it to the iPhone with the PhotoSync app.
DramaticB&W - to create a pseudo HDR picture in b&w.
SimplyHDR - to create a pseudo HDR picture in color.
FilterStorm - to erase the main subject from the b&w layer so the colored version came trough. To do this I opened the color picture, then imported the b&w picture as a second exposure. Then I painted a mask over the woman and the card boxes. I prefer switching "show mask color" on in "Masking View" because it allows a very precise work. After having finished painting the mask I let FilterStorm process the picture and saved the result before I processed it further, adding a slight vignetting and a frame.
A+Signature - to add my copyright watermark as usual.

July 3rd, 2008 was a rainy day in Nancy in France. I walked the streets with my Canon ready for shooting as I spotted this old woman searching card boxes put on the sidewalk to be removed by the garbage collectors. I quickly snapped out a couple of shots because I did not want the old woman to notice that she had been photographed and I felt like a thief about it because I've got to confess that I'm not familiar with the French laws regarding privacy. All that I know is that one needs the consent of a person one intends to photograph in Germany as well as in Luxembourg. But France? No clue! And the two shots had been underexposed anyway so I didn't think much about it anymore.

Back at home I developed my photos of the day using Canon's software and as I corrected the underexposed shots I suddenly discovered something I did not see as I shot the photos. On the card box in the foreground on the right side, the words "Le bon pain pour tout le monde" became readable, which translates as "The good bread for everybody". And then I suddenly got aware of the whole perversion behind this rather accidental picture. The card boxes full of still edible sandwiches, cakes and slices of Pizza had been put on the sidewalk by the personnel of a so called "Sandwicherie" - one of these typical small sandwich stores you can find everywhere in France. The food apparently was from the day before, not fresh enough anymore to be sold. So it had been thrown away rather than giving it to the needy ones, living on the street - "the good bread for everybody" got dumped. This woman looked like she was one of the homeless. She got away with a great prey on that day. 

In Germany this is handled much differently. There are welfare organizations like "Die Tafel" that collects surplus food to distribute it among those who need it. But nevertheless there are many thousands of tons of good food being carelessly dumped on every day in our affluent society while many others must starve. This had always been something incomprehensible to me because I had been educated to respect my food and avoid unnecessary waste if ever possible.

I did a color key version of this photo in PhotoShop already in 2008 but I like this iPhone4 processed version much more because it's more dramatic.

Monday, October 3, 2011

All Gone


Camera App: BracketMode
Extras: Ollo Clip 3in1 lens system - wide angle lens used.

Additional Apps used:

iCameraHDR - to create a HDR picture from the shots made with BracketMode.
Camera+ - to apply the "clarity" filter which greatly enhanced the picture. With many thanks to Harry Sandler for this very useful tip.
DramaticB&W - to create a b&w version of my picture. I created  two versions - one where I used the preset style "Infrared4" and one where I used the style "Dramatic2". I played around a bit the the color filters until I had the look that I liked. I also set grain to zero because the pictures came out already grainy after the creation of the HDR. 
Blender - I wasn't completely satisfied with neither b&w version, the infrared version being a bit too bright and the dramatic version being too dark so I decided to load them both into Blender and see what I can do with it. Blending them in overlay mode with a 50:50 slider setting finally gave me the result I was looking after.
Iris - to crop and resize the picture.
TouchRetouch - to remove a litte white spot.
FilterStorm - to create a nice white frame with a thin black line in it. FilterStorm had the great advantage to add an outlining shadow to a frame, which can be adjusted. Standard setting is light gray but I set it to a very dark grey. I applied a 10% white frame first, then added a 5% black frame before I finally added a15% white frame again. Because of the added outlines the frame looks very nice to me.
A+Signature - to add my copyright watermark.

Yesterday I started working in the late afternoon as the sun was already low and bright. Because I still had time before departure of my first train to drive on that day I took my chance to make some photos inside of the now empty roundhouse #1 of the old railroad yard in Luxembourg. I still don't know when the demolition team will come to break this all down but I sincerely hope to get a chance to photograph the sad event. Below is the first picture that I created. The procedure was about the same as the one describing the making of the b&w picture with the only difference that I did not use DramticB&W and Blender on this one.


~~~~~~~~~~~~~~~~~~~~~~~~~~~~~~~~~~~~~~~~~~~~~~~~~~~~~~~~~

Saturday, October 1, 2011

Where Generations Walked


Camera Apps: 
BracketMode - for the stairway photos
Lomora2 - for the photo of the building

Additional Apps used:
iCameraHDR - to make an HDR picture from the photos shot with BracketMode. The camera app is very handy if you want to make HDRs but prefer processing the photos later. BracketMode shoots two photos, a light one and a dark one which are automatically saved on the iPhone Camera Roll.
Romantic - for a dreamy effect. Romantic was made bei none less than JixiPix, the makers or the Artista apps.
PicGrunger - for the frame and a minimal grunge effect.
TouchRetouch - for slight retouching. I only removed two little white spots up left in the picture plus a very dark stroke on the lower right corner of the frame with it.
PhotoForge - to create a high pass effect on the picture for sharpening.
Blender - to blend the high pass picture with the normal picture which nicely enhanced sharpness and clearance but reduced the dreamy effect a little. You now maybe ask why I sharpened the picture after I added the frame. Well, this is a matter of personal taste indeed. You may do as you like. I usually finish a picture before I put it in a frame, but in this case I thought it could be nice to have the structure of the frame also enhanced, and for that reason I applied my sharpness trick after I finished the picture. There are frames the effect will do well but there are sure other frames where it won't work. Just try it out and use what you like.
A+Signature - for the copyright watermark

Yesterday I was at work early so I took a little time strolling over the ground of the old railroad yard to make some photos because soon the old buildings will be flattened to make room for the expansion of the new maintenance center. The stairs in this picture are in the old building that still holds the locker rooms of locomotive engineers and maintenance crews as well as offices, a conference room, bedrooms for the foreign engineers who once used to spend the night there, and there's even a kitchen. Also in this building is our old reserve room where we spend our reserve time, meaning the shifts setup to have personnel in reserve for the case a colleague reports sick, or other irregularities in the organisation of rail traffic required additional help.


Somebody once gave the name "Hotel Simon" to the building. "Hotel" maybe because it once hosted our foreign colleagues when they had to spend the night abroad to respect their resting times. And "Simon" maybe because this is the name of a very popular breweries in the country. Who ever knows, I don't. On the Lomora photo you can see the building, with the old roundhouse in the back ground. The warning sign translates as "Danger, the pedestrian crosses the tracks on his own risk and responsibility".

My main picture shows the stairway that leads from the old reserve room down to the court. Standing there yesterday I was wondering how many engineers walked that way down when they had been called for some special task while they had been on reserve duty? It must have been quite some generations since WWII ended and everything had been rebuild. I too was one of these guys. For that I gave my picture the title "Where Generations Walked".