Sunday, May 29, 2011

Come and ride with me...


Camera App: iCameraHDR


Additional Apps used:


TouchRetouch - for minor corrections of the HDR picture
PS Express - for noise reduction, and later to add a black border
Picture Show - for the white border
Photo fx - to do a set of high and low contrast layers as well as a pencil drawn layer to be used later with Blender
Vintage Scene - to create a vintage version of the original HDR picture
Blender - to blend original HDR with all the other layers. Donno anymore how many times I blend what layer with what result.
FilterStorm - for sharpening a bit
A+ Signature - for the watermark


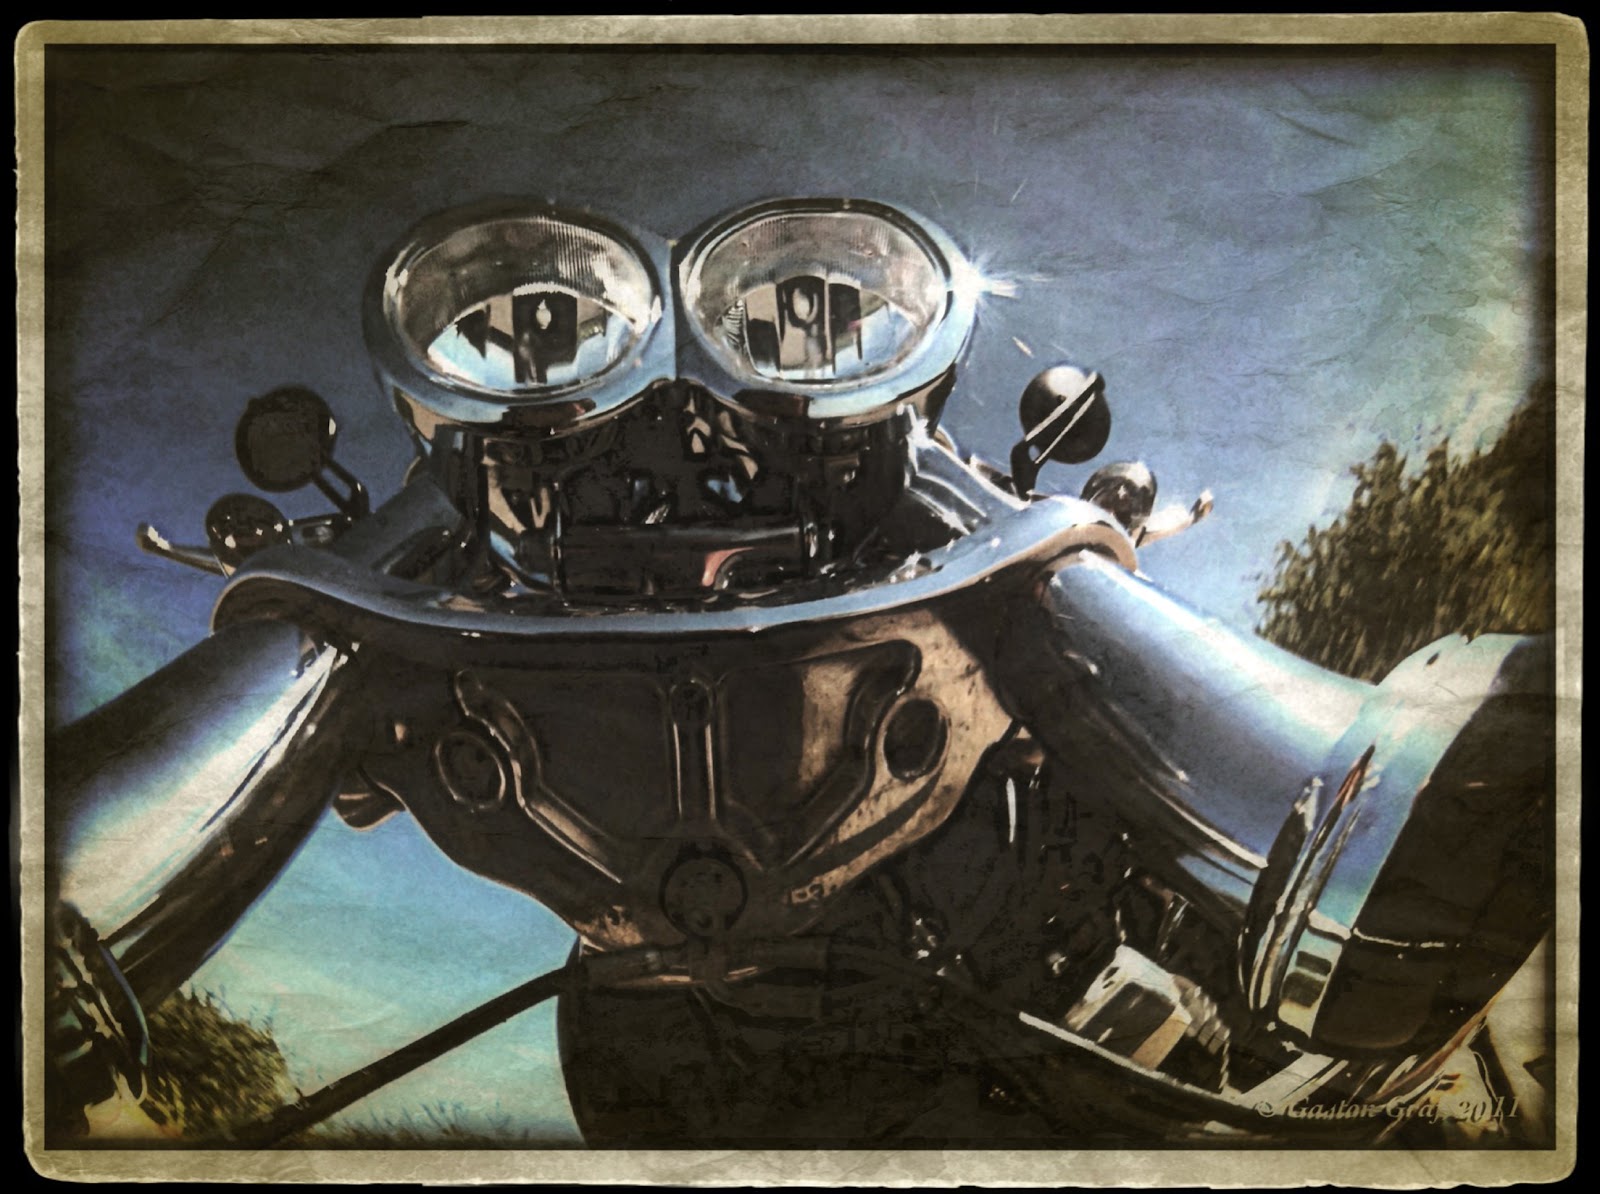
After returning home from a 56 miles ride on this afternoon I stopped about half a mile before my home to make some photos of my bike again, especially to redo a photo that I made already a week ago but then I discovered that the front fender of my bike had been too dirty to make it a nice photo so I decided to redo it another day. Today I had the time to retake that photo of the reflection of my Fat Bob's head lights and fork in it's shiny front fender. I did a nice HDR picture of it (below) but found it too boring so I experimented with various apps on my iPhone. The above picture is the result of it. I enjoyed making this picture as much as I enjoyed the ride across the country roads before. Beautiful weather, beautiful landscape, and an awesome feeling of joy and freedom... Well, that's the spirit of Harley Davidson ;o).


Friday, May 27, 2011

Wheels of Steel


Camera App: iCameraHDR


Additional Apps used:
PhotoForge 2
Pic Grunger
ArtistaSketch
Blender
TouchRetouch
A+ Signature


I always wanted to make a picture of the many axles and wheels kept in store at the railroad repair and maintenance workshops in Petingen, where I come along often when I'm on the rails, driving trains. Yesterday was the day for it. I had to park my train at a side track close to the place where the reserve wheels for freight cars are stored so I jumped off my train to make a whole lot of photos from all angles until I had to take another train to Rodange. I made the photos with iCameraHDR. What I really love about that app is that it can save a set of photos for later processing. That way one doesn't need to wait until the HDR picture is ready which saves a lot of time.
Later, as I had the time for it, I created the HDR picture which I then processed with PhotoForge 2 to optimize it. I added a frame in Pic Grunger, and liked the result as a photo, but still I wasn't satisfied with it because it looked like an ordinary photograph - just boring.
But a new day often brings a new idea and after breakfast on this morning I had the idea to create a drawing layer in ArtistaSketch to blend it with the previously made picture and I really liked the result. I then blend the layers in Blender, using normal blend settings with standard 50% blending. I used TouchRetouch only for minor corrections. A+ Signature to add my copyright watermark.

Sales & Services


Camera App: Hipstamatic


Additional Apps used:
Vintage Scene
FilterStorm
A+ Signature


This beautiful motive is on the back of my first Harley Davidson T-Shirt that I got from my darling wife,

Thursday, May 26, 2011

DANGER - High Voltage!


Camera App: ProHDR


Additional Apps used:
iCameraHDR
Pic Grunger
FilterStorm
A+ Signature


A typical warning sign like this one can be found everywhere at the railroads to warn about the 25000V power lines the engines take their power from. This rusty sign is attached to the inner side of a gate to the old roundhouse #1 at Luxembourg railroad yard. 
The original set of photos had been made with ProHDR because at that time I did not own iCameraHDR yet. I processed the photos in iCameraHDR for testing and I really like the result. iCameraHDR seems to be the best HDR app currently available.

Wednesday, May 25, 2011

Restoration in progress...


Camera App: ProHDR - for the initial HDR picture
Additional Apps used:

PictureShow - to create a b/w version with strong contrast.
FilterStorm - to create a tone mapped version.
Blender - to blend the tone mapped and b/w pictures 50/50 normal mode
PicGrunger - for the dirty frame
A+ Signature - to add a copyright watermark.


Engine 3608 is a French type build in 1957 that my company operated for more than 40 years. We had 20 engines of that type. 3608 will be last one of it's type to run as a museum engine on tourist trains. As far as I currently know it will be restored to it's initial look from the 1950's as the type got delivered, still wearing the four headlights on it's front ends. Later this got modified to only the two headlights so lower and bigger headlights remained.

Friday, May 13, 2011

Walk over, and see...

Camera Apps:
Lomora 2 - for the photo of the bridge as well as for the sky photo
Hipstamatic - for the texture photo of a horse skin. Lens: Helga Viking - Film: Blanco

Additional Apps used:
FilterStorm 2
TouchRetouch
Blender
DynamicLight
VintageScene
PS Express
PictureShow
PicGrunger
A+ Signature

A few days ago I went to the ruins of Castle Useldange which is only about two miles from my home. I also made some photos of this foot bridge that goes over the little creek called Attert, which runs behind the castle, separating the village of Useldange in two parts. The stone bridge for the cars is at about 200 yards to the right from this place. The foot bridge ends in the green, where people can walk and where each year a medieval market is being held as well as the re-enactment of a knight's tournament.
I made some photos with the Lomora 2 camera app which I love almost as much as I love the Hipstamatic for the beautiful Lomo effects it's creating. Later that day as I was at the stables again with my daughter I watched her cleaning her horse Billie's skin with a wet cloth to take the dust off after she brushed it. The horse looked really neat so I took some photos of Billie's hair, thinking it could serve me for texture. As I worked on my picture in the evening I soon realized what good idea I had to make horse skin photos. I really loved the effect it created. But despite the nice and streaky effect of the skin texture the sky still looked too blank for me in the original bridge photo so I took a Lomo photo of a landscape that I had made the same day. Unfortunately the dark hedges in the middle of the photo had a negative effect on blending so I removed the hedges with TouchRetouch to have only sky and mowed meadow left. I blend the layers, enhanced colors and dynamic range a bit in Dynamic Light, added a nice grunge effect in VintageScene, used FilterStorm2 to de-vignette the picture, the PS Express to add that black ink frame and PictureShow to add a white frame, PicGrunger for a worn frame look by application of the wooden texture, and A+ Signature to add my copyright watermark. I did several versions of this picture but in the end I liked this one the most.


Sunday, May 8, 2011

Folks here's a link I'd like to share with you. It's the Hipstamatic Website of Didier Massot from Paris. His pictures are very inspiring to me. The text is in French only, but let the pictures speak.

Friday, May 6, 2011

The Living Mask


Camera App: Hipstamatic
Lens for the mask photo: Helga Viking
Film for the mask photo: Cano Cafenol
Lens for the tree photo: Roboto Glitter
Film for the tree photo: Alfred Infrared
Lens for the eyes photo: Helga Viking
Film for the eyes photo: Cano Cafenol


Addtional Apps used:
FilterStorm 2
Blender
Iris Photo Suite
iDarkRoom
TouchRetouch
Layers
PhotoForge
A+ Signature


The mask is a Venetian Carnival mask that hangs on the wall in our kitchen. The tree photo that had been used to blend the mask photo which was taken from underneath a tree to picture its branches, but not much remained visible of it after using the beautiful texture of he flaked off paint in iDarkRoom. The eyes had been taken from a self-portrait of mine that I made a few weeks ago. I would have preferred to use female eyes here but I had no other eyes at my disposal as I worked on this picture. The picture had been put together in Layers and blend in Iris. TouchRetouch and PhotoForge had been used to do minor corrections mainly around the eyes.
This picture was a test to practice how I can compose a picture on the iPhone using parts from different photos. It's still far from being perfect but I learned a lot as I made it and I enjoyed every step as I saw it developing on my little iPhone screen.

Sunday, May 1, 2011

Midnight Tulip


As I saw the only Tulip currently growing in a pot on our terrace and heavily inspired by the beautiful work of Teri Lou Dantzler I dared to start a practicing project. There are thousands of miles of distance between Teri and me so I cannot easily participate in one of her classes, but studying her work closely I can learn from her nevertheless. This picture is the outcome of it. It is based on a normal Hipstamatic photo made with the Blanco Film and the Helga Viking lens to obtain a clean photo not influenced by too many added effects. My wife told me the Tulip is not one of the regular Tulips with the typical rounded calyx. This Tulip has rather jagged leaves that are not holding well together as the calyx was blown open by the wind. I made quite a lot of photos of the flower and liked this one the most. The original color of the Tulip is a dark pinkish Red and the center is pale yellow. But playing around with different settings I end up with a nice Blue that I really liked.


Camera App: Hipstamatic
Lens: Helga Viking
Film: Blanco


Additional Apps used:
Filterstorm 2
ProHDR
Iris PhotoSuite 1.4
AutoPaint
ArtistaSketch
PictureShow
TouchRetouch
VintageScene