Saturday, September 24, 2011

Awaiting Demolition


Camera App: QuickPix - I love that app because of it's speed.

Additional Apps used:
Artista Haiku - for an ink version of my photo because the clear blue sky appeared too boring to me.
Blender - to blend the original photo with the Haiku version, normal mode, 50%.
Iris - for cropping. I didn't like the original proportions because there was too much clear blue sky in it.
Snapseed - for the nice frame.
Iris again for resizing - after cropping, the picture size was 2551x1320px but I wanted to have at least one of the measures at normal size so I resized the picture to a witdth of 1936. Iris suggested to keep the aspect ration of the picture so I end up with 3741x1936, the width of 1936 being the normal photo width of photos made with the iPhone camera.
PhotoForge2 - to apply a high pass filter for sharping. Please see my previous post for details about the procedure.
Blender again - to blend the high pass version with the Haiku/Normal blending result which sharpened the picture nicely. But it's a matter of taste to re-sharp or not re-sharp. After boosting the picture size to 3741x1936 its sharpness wasn't much decreased but I preferred a crisper look over a softened look so I re-sharpened it using the high pass layer trick.

The old roundhouse at Luxembourg railroad yard was home of countless railroad engines from the glorious times of steam until the modern times of high tech problems put on steel wheels. Bombed and partially destroyed by the US Air Force in WWII, as Luxembourg was occupied by Nazi-Krauts, it was rebuild after the war but now it faces its fate of demolition in the coming weeks, or maybe only days since there is an all new maintenance center already in the process of construction. It's quite a sad view to see the old roundhouse now deserted, silent, all of it's guests gone. In the early years of my career I often took one of the Diesels out of that roundhouse for hauling passenger trains or freight trains. I guess I'll never forget the particular smell of the location, sort of a decades old mix of engine oil, diesel evaporation and exhaust smoke...

Old Beauty


Camera: Canon EOS40D 
Lens: 17-85mm EF USM Kit lens

Apps used:
Squaready - to cut a square format out of the original photo. Squaready is very handy for that cause it allows saving the new picture in 2048x2048px as well as to transfer it directly to Instagram, Gyrocropper or other apps.
PicGrunger - to give the original b/w picture a worn look.
Instagram - to add the "Rise" effect.

Playing around a bit with Instamatic I end up with this. The picture is based on a high contrast b/w photo that I made with my Canon already two years ago. The beautifully restored old Castle of Vianden stands on a hill surrounded by the picturesque little town of Vianden. It can be visited and every year in August there is a medieval week with a medieval market and re-enactment of sword fights and such. In October there is the walnut market, another attraction about everything one can do with the walnuts growing on trees around town. There you can buy walnut bread, cookies, cake, pâté, sausages, hard liquor, sweet liquor for the ladies, and more. Then the narrow cobblestone streets are overcrowded with people coming from all directions, even from the Netherlands and the neighbor countries. The castle can also be visited inside indeed.

Wednesday, September 21, 2011

How to: Smart-Sharpen Photos on the iPhone


Camera: Canon EOS40D
Lens: Canon 17-85mm EF USM Kit lens

Apps used:
Photoforge2 - to create a high pass layer.
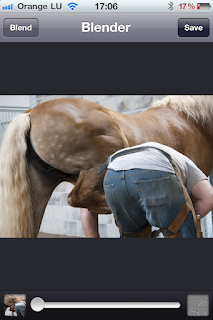
Blender - to blend the high pass layer with the normal layer, slider at 100%, blending mode "Overlay". This method neatly sharpens the whole picture without adding noise. Look at the details on the jeans of the blacksmith! Zoom in and you can even see it's structure.
PhotoForge2 again - after sharpening the photo by blending the high pass layer with the normal layer I reimported the sharpened layer into PhotoForge to apply a Lomo filter as well as to add a white frame.
A+Signature - to add my copyright watermark

Some apps include the option to sharpen a picture but no matter what app I tried I realized that even the best apps end up with a lot of noise after sharpening, no matter if you are using PS Express, FilterStorm3, Iris or whatever. For that reason I applied sharpening filters only modestly. But I always wished to have the possibility to use the same procedure for smart-sharpening that I use in PhotoShop CS5 where I create a copy of my original layer, then apply a high pass filter to that layer, go to the layer's blending options and choose "Overlay" from the menu - et voilà the picture is crystal clear and sharp. On the slider one can adjust the amount of sharpening. Sometimes 100% is a bit too much so you need to adjust a lower setting.

Ok, that's for PS on the big screen. Now I finally found a way to do the same thing on the iPhone, which will also work on the iPad. Currently PhotoForge2 seems to be the only app that comes with a high pass filter (as far as I know, but I may be wrong indeed since I don't know all the apps). I apply that filter to my original picture and save it as a new picture (=layer). Don't worry if your screen turns all gay after applying the filter cause you need to move the slider to the right to see an effect. I used a value of about 200. You don't need to adjust it to exactly 200.00 which is quite impossible. Just use any value close to 200.


After saving that picture I opened Blender where I added the original picture plus the high pass picture for blending. Settings: Blending mode "Overlay", Slider to 100%, original picture on the left, high pass picture on the right. Please see the screenshots below. Do you see the difference? The first picture is unsharpened, the second picture is sharpened:


I applied the same editing procedures to a set of six photos I made one day in June of 2009 as the blacksmith was at the stables to give my daughter's horse Billie a manicure. I asked him for his permission to make photos while he works and he agreed. Billie is a very gentle horse. She truly enjoys to have her hooves cared for - well, but that's part of the female character, isn't it ;o)?


The apps that I used on this set are all top notch apps on the long list of photo editing apps, not just because of the possibilities they provide to create beautiful pictures but also because all of them don't ruin the original photo resolution on saving. I processed all of the above photos in original resolution of 3888x2592px. The iPhone needed some time for processing but this wasn't much more than it needs to process original iPhone pictures. I tested this on a Hipstamatic photo that I also sharpened. See below: 


~~~~~~~~~~~~~~~~~~~~~~~~~~~~~~~~~~~~~~

Sunday, September 18, 2011

Lilly and friends... (with Gustav, Flöckchen, Anton, Bob and Gabriella)


 These are the little friends of my daughter:

Lilly  -  Gustav  -  Flöckchen
Anton  -  Rasta Bob + Gabriella (the little ones)


Camera App: QuickPix

Additional Apps used:
Luminace - I discovered this well designed app two days ago and made this photo only to test it.
Camera+ - to add a 25% analog effect called XPRO C-41
FilterStorm3 - to add a 10% white border without outlining. I prefer using FilterStorm for adding simple frames because FilterStorm in fact adds them to the actual picture, it does not overlay the picture with frames as most other apps do.
PhotoForge2 - to add frame No.7
A+Signature - to add my copyright watermark

As I discovered Luminance at the appstore I became curious about it, especially because it allows saving edited pictures in their original full resolution so I decided to test it and I had not been disappointed. Luminance is easy to use. It offers 19 FX presets plus sliders to adjust White Balance, Exposure, Brightness/Contrast, Hue/Saturation, Tone Curve and Colors. Also there are three adjustable effects listed: Sepia, Split Toning and Vignette.

First thing I did was to adjust the Hue/Saturation settings as shown on the screen shot below:


Then I adjusted the Vignette effect:


You may also zoom into the picture preview and switch to full screen preview which is very handy.


Unfortunately there is no name shown for the 19 FX presets when you scroll the list but when you tap the clock icon you may go steps back and there you can see then what presets or settings you tried. The last preset listed was the one that I applied. It's called "Dystopia".

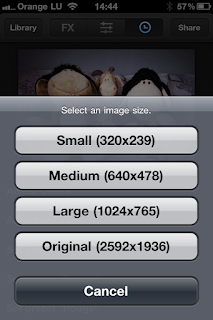
 On my last screenshot you can see what resolution modes the app is offering to save your work. Needless to say that I saved mine in the original 2592x1936px.
Conclusion: Luminance is a really good choice to enhance a photo. The only things that I miss is a denoise filter and a sharpening filter so it's time to contact the developer team and make them some suggestions.

Friday, September 9, 2011

Grunge Me Up - Gimme That Carrot!


Camera App: Hipstamatic
Lens: Melodie
Film: Ina's 1935
Accessories: Ollo Clip Fisheye lens

Additional Apps used:

Noir - to create a black and white version of my photo
Grungetastic - to test the latest update of it.
TouchRetouch - to remove a single white spot from the horse box that was nothing else but bird dung dropped by one of the many swallows flying in and out the stable.
Iris - to find out that not all apps recognize the true resolution of a picture (more about that in the text below)
FilterStorm3 - to resharpen the picture slightly (20%).
A+Signature - to add my copyright watermark as usual.

Checking the Appstore for updates of my installed apps on this morning I saw there was an update for Grungetastic, which is one of the very best apps to have when it comes to give a photo a more or less worn and weathered look. And YES, the developer team did hell of a good job to improve the app further, even though if it becomes a bit more expensive now with 4 additional in-app-purchases. But they are worth the price, boosting the possible combinations of grunge styles and settings beyond an uncountable number.
To test the new update of Grungetastic I was loading a recent photo that I made of a horse called Gin Tonic, who is the neighbor of my daughter's horse Billie at the stables. I was playing around with that photo already days ago as I tried out Noir. Now I used the b/w version I made with Noir to test Grungetastic. I'm sorry for not being able to provide a complete list with all the steps that I took to get to the final version of my picture. I was just playing around with Grungetastic, trying this and trying that, adjusting intensity and colors of quite a bunch of different possible effects. All that I remember is that my picture is based on the style Distressed #6, that is now available as in-app-purchase. I really had a lot of fun playing around with Grungetastic.
And then I discovered something weird.... Grungetastic can save a picture in the original photo resolution if it's configured for that in its settings, which was 1936x1936px. After I removed that white spot from the picture in TouchRetouch I discovered that TouchRetouch was boosting the resolution to incredible 4072x4072px (and I wondered what's that good for), But crosschecking that in the (free) app Picture Size I saw that it was true. And checking it on my big laptop screen I also saw that the quality of that boosted picture was very good. Even at a zoom factor of 216% there was no visible artifact in it. I then wanted to downscale the photo back to its original size of 1936x1936px in Iris, which is another one of my top favorite apps. But obviously there is a slight flaw in Iris because it seemingly cannot recognize high resolution photos correctly as it showed the picture with a resolution of only 3072x3072. I investigated the resolution case further and applied a Comic Scene FX effect (30%) in Iris, then saved the picture without changing its resolution - what Iris gave me back of the original 4472x4472px was nothing more than 2272x2272px.
Ok, that was for testing purpose only. I went back to my original GrungeTastic+TouchRetouch version to sharpen it slightly in FilterStorm3 (20%) and after saving I got a picture with a resolution of 2738x2738px. I was adding my copyright watermark in A+Signature which also saved the picture in 2738x2738px. Now, again only for testing, I was loading the 4472x4472 version in A+Signature to see what it's making of if after adding my watermark and YES, A+Signature keeps the original resolution even if it's that high.

Conclusion: Even the best apps don't necessarily keep the original resolution of a photo processed with them, but at least they provide a resolution which is still higher or equal to the original photo resolution. Really bad are apps that ruin the original resolution but sadly there are way too much of those lurking for your money in the Appstore.